Antifouling paint (often called antifoul) is essential for any boat or vessel kept in the water. It prevents barnacles, algae, slime, and other marine growth from attaching to the hull below the waterline. Without it, fouling increases drag, reduces speed and fuel efficiency, raises maintenance costs, and can even damage the hull over time. A properly applied antifouling system can last 1–3 seasons, depending on the paint type, boat usage, and water conditions.
Whether you’re a DIY enthusiast or preparing for a professional job, the “best ways” boil down to thorough preparation, the right materials, proper technique, and attention to safety and environmental rules. Here’s a complete, step-by-step guide based on expert recommendations from leading marine paint manufacturers and boating authorities.
1. Choose the Right Type of Antifouling Paint
Selecting the correct paint is the foundation of a successful application. The two main categories are:
- Ablative (Self-Polishing or Copolymer) Paints: These wear away gradually as the boat moves through water, continuously exposing fresh biocide. Ideal for most cruising boats that stay in the water or are used regularly. They prevent paint buildup over multiple seasons and work well in both salt and fresh water. Examples include products like International Micron or Pettit Hydrocoat.
- Hard (Modified Epoxy or Vinyl) Paints: These dry to a tough, non-eroding finish. Best for high-speed or racing boats, trailered vessels, or those that need a smooth, sandable surface. They require more maintenance (sanding between seasons) and can build up over time.
Other options include foul-release coatings (silicone-based, very slippery) for performance boats and aluminum-safe formulas (avoid copper-based paints on aluminum to prevent galvanic corrosion – use zinc or metal-free biocides instead).
Pro tip: Always check compatibility with your existing coating using the manufacturer’s chart. Stick to the same type (ablative over ablative, etc.) unless using a tie-coat primer. Calculate how much you need: Waterline length × (beam + underwater depth) × 0.5–0.75 (depending on keel type), then divide by the paint’s coverage rate per liter.
2. Gather Tools, Materials, and Safety Gear
Essential items:
- Solvent-resistant rollers (medium-pile mohair or sheepskin—avoid foam or short-nap, which give thin coats).
- Good-quality brushes (2-4 inch for edges and waterline).
- 80-grit sandpaper or Scotch-Brite pads.
- Masking tape (high-quality painter’s tape that withstands outdoor conditions).
- Paint tray, stirring drill attachment, and drop cloths/tarps.
- Pressure washer, scrapers, and hull cleaners.
- Primer or barrier coat (epoxy-based for bare fiberglass or repairs).
Safety first (non-negotiable):
- Full PPE: Coveralls, gloves, goggles, respirator with organic vapor cartridges (not a simple dust mask), and boots.
- Work in a well-ventilated area on a hard-standing or bunded surface to contain waste.
- Antifouling is toxic – follow local hazardous waste disposal rules.

3. Step-by-Step Application Process
The key to long-lasting results is preparation (80% of the job) followed by thick, even coats.
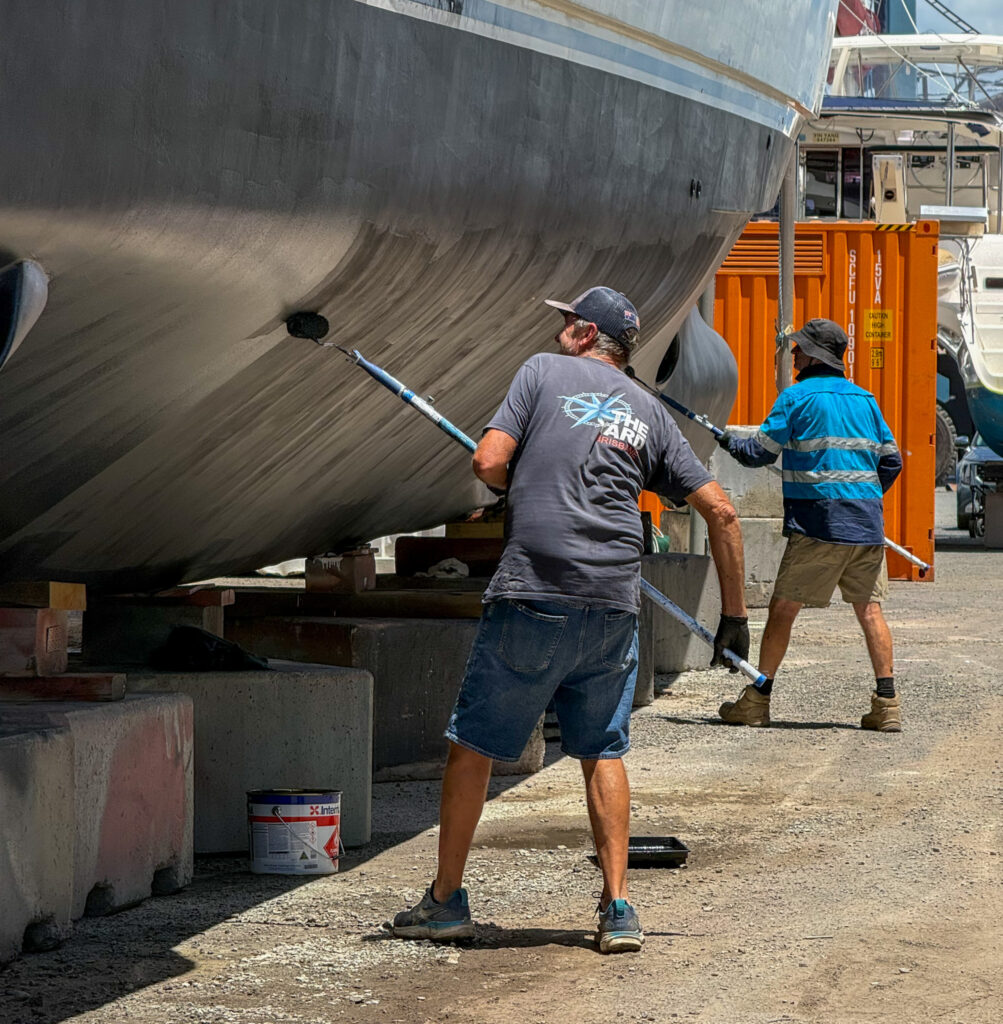
Step 1: Haul-Out and Initial Cleaning – Pressure-wash the hull thoroughly to remove slime, barnacles, and loose paint. Scrape any flaking areas. The team at The Yard Brisbane will include pressure washing in your list of services to be completed at the time of haul-out by the operations team.
Once clean, let the hull dry completely.
Step 2: Sand and Prep the Surface – Lightly sand with 80-grit paper (wet sanding preferred to control dust) to create a “key” for adhesion. Wipe down with fresh water or recommended solvent to remove all salt, dust, grease, and wax (critical for new gelcoat). Repair blisters, gouges, or osmosis with epoxy filler and primer.
Step 3: Masking – Apply high-quality tape along the waterline/boot stripe for a crisp edge. Protect anodes, transducers, props, and through-hulls with tape or foil. Remove tape while the final coat is still tacky for the cleanest line.

Step 4: Prime Where Needed – Bare fiberglass, stripped hulls, or incompatible old paint requires an epoxy barrier coat or tie-coat primer. Follow the product’s overcoating windows exactly.
Step 5: Mix and Apply the Antifoul – Stir the paint thoroughly (use a drill mixer – pigments settle heavily at the bottom). Pour into a tray and keep the tin lid on when not in use. Apply 2-3 coats with a loaded roller (perpendicular to the waterline or waterline-to-keel). Use a brush for the waterline (brush downwards to avoid pushing paint under tape) and high-wear areas like the keel, rudder, and bow. Aim for the recommended dry film thickness (typically 60+ microns per coat) – use all the paint you calculated rather than skimping. Apply extra coats on leading edges.
Ideal conditions: 10-29°C, humidity below 85%, no direct sun, wind, or rain. Paint in the morning after dew has evaporated. Check the label for exact recoat and launch times (some paints have a maximum out-of-water window).
Step 6: Clean Up and Launch Remove tape while tacky. Dispose of waste properly. Launch within the manufacturer’s recommended timeframe for best performance.
4. Best Practices for Pro Results
- Extra coats in high-wear zones: Waterline, keel leading edge, rudder, and prop areas get the most turbulence.
- Color layering: Use different colors for each coat (e.g., grey primer, then black, then red) so you can see wear and know when to repaint.
- Fall application: Paint in autumn for spring launch – ablative paints stay effective out of water.
- Aluminum hulls: Use only compatible, non-copper paints and proper primers.
- Quantity over perfection: A slightly uneven but thick coat beats a thin, perfect-looking one.
5. Common Mistakes to Avoid
- Poor stirring → uneven biocide distribution.
- Inadequate prep or painting over salt/dirt → peeling or blistering.
- Wrong roller or thin coats → reduced lifespan.
- Ignoring temperature/humidity or launch windows → adhesion failure.
- Using incompatible paints or copper on aluminum → corrosion or flaking.
6. Maintenance After Launch
Lightly scrub the hull periodically with a soft brush (never harsh abrasives on ablative paints). Check for wear annually. Most boats need reapplication every 1–2 years.
Conclusion
Applying antifouling correctly is straightforward but demands patience and precision. Invest time in preparation and follow the paint manufacturer’s instructions to the letter – you’ll enjoy a cleaner, faster, more efficient hull for seasons to come. For larger and more complex vessels and applications, or if you’re unsure about compatibility, contact the team at The Yard Brisbane for any tips and recommendations, or for an estimate on your job.
No matter what, a well-protected hull means more time enjoying the water and less time (and money) on maintenance!
Stay safe, respect the environment, and happy boating! Always consult the specific technical data sheet for your chosen paint, as formulations vary.